I love to have fun with paper, food, paint, music and events and just being creative in all of it. However, I don't feel the need to be a perfectionist nor a professional in any of my creations. I wish I could have a blog JUST about the art of cooking, photography, sewing, art, mothering, jewelry making, card making, dancing, gardening, deep spiritual thoughts, decorating, poetry, party planning, baking.... and the list goes on but I can't. I don't think I was created with the ability to focus on one task. I like all of these hobbies layed out before me and the freedom to pick whatever I choose depending on the mood or time I have.

Monday, April 25, 2011

In the mood: Strawberry Cheesecake Pancakes

Cheesecake PancakesPancakes are something I enjoy making. They can be a dessert, snack, meal.  These Strawberry Cheesecake Pancakes really satisfies that sweet tooth and doesn't have all the calories of an actual piece of Cheesecake.


2 cps of Pancake mix 
4 oz cream cheese
1/2 cup graham cracker crumbs
1/4 cup sugar
1 cup milk
2 eggs
CREAM CHEESE GLAZE:
4 Tablespoons butter
2 ounces cream cheese
3/4 cup powdered sugar
1/2 teaspoon vanilla extract


1. Slice the cream cheese lengthwise into four pieces. Place on ungreased cookie sheet; cover and freeze 8 hours or overnight.
2 Brush griddle or skillet with vegetable oil, or spray with cooking spray; heat griddle to 375°F or heat skillet over medium heat.
3 Cut cream cheese into bite-size pieces; set aside. In large bowl, stir pancake mix, graham cracker crumbs, sugar, milk and eggs with whisk or fork until blended. Stir in cream cheese.
4 For each pancake, pour slightly less than 1/3 cup batter onto hot griddle. Cook until edges are dry. Turn; cook other sides until golden brown.
5 Top pancakes with glaze mixture and strawberries. Or you can use strawberry syrup.

I was inspired by Spring 2010 winner on bettycrocker.com.  I adapted the recipe.


If your mornings are like mine your always looking for quick and easy breakfast.

linked to:
http://ladybug-blessings.com/
http://funkypolkadotgiraffe.blogspot.com/

Featured in these Wonderful Blogs


Thanks ladies for sharing the Love!

Wednesday, April 20, 2011

Mod Lunch Clutch

This Mod Lunch Clutch is not only adorable but it is also going green!   Recycle your empty wipes bag and throw out those brown paper lunch bags.  The wipes container are wipeable on the inside so if you have spillage it can easily be wiped down with a wet cloth. You may want to buy wipes that are not scented so the bag doesn't have a baby scent, that is unless you like the baby scent :). 

What you will need:
-Empty Wipes bag
-Craft glue
-scissors
-various colored ribon

1. I applied the orange polka dot ribbon on the side by piercing a hole on the upper corner with scissors. I ran the ribbon through it and then tie a knot at the end and hand stitched it in place.


This super easy craft starts with glueing the ribbon onto the wipes bag.  Apply glue and press ribbon over it.
2. If you want the ruffled look than fold in the ribbon and then press it down on the glue. 

3. Do this until the whole bag is covered. 

Voila! Your done in less than 20min.
I made another one here

Wednesday Link ups

Whatever Goes Wednesday

Your Way Wednesday
733blog
womenwhodoitall

Tuesday, April 19, 2011

Magnetic Mr. Potato Head

Endless fun with this Magnetic Mr. Potato Head! This is a great traveling, church, meeting activity for the kids.
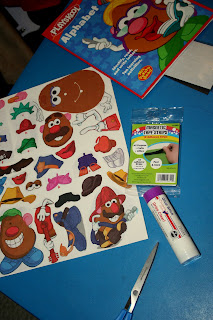
I was helping my toddler with his "homework" in his Playskool book. He insisted for me to give him some homework. Oh, how I wish that enthusiasm follows him throughout  his teen years.
When we got to the end of the Mr. Potato Head themed Alphabet book they had some cut outs for you to glue and make your own Potato Head.  That's when I had my aha moment and thought we could use magnets so he can keep playing with them.
What you need:
Playskool Mr. Potato Head Themed workbook
Glue
Adhesive Magnets
Cardboard
Clear Contact paper

1. I went through the book and I cut out all the different Mr. Potato Heads and their outfits.
2. Glue them all to one piece of cardboard paper.
3. Apply Contact paper over it.
4. Cut out each individual pc and place the magnets on the back.


Store them in a tin box w/ a handle for easy traveling. You can find these at your local craft store in white. 
Endless fun to be had!  Great for travel!

Linked up withToo Cute Tuesday

Monday, April 18, 2011

Cascarones

In our home holidays always have a slight twist from the traditional American family.  We are a interracial couple: Mexican-Puertorican and Southern roots living in Ecuador.  Lots of culture to choose from!

Growing up in a Mexican home our family enjoyed the Cascarones tradition on Easter. Decorated eggs are a traditional part of the Easter season in the US and in some parts of Latin America. In Mexico, cascarones, confetti-filled eggshells meant to be broken above the head of a friend, are part of the holiday celebration. Many people make a wish as they break the egg. According to tradition, a confetti shower brings good luck to both the one who breaks the shell and the one whose head it is broken over.

How to Make Cascarones:
Before your celebration, dye empty and clean shells and decorate them with paint or markers. When the design is dry, fill the egg with confetti. A hole punch can be used to make a lot of confetti very quickly. Paper is then glued over the hole to keep the confetti inside. I actually bought my confetti, sooo much easier.

It's an EGG-xellent tradition! Sorry couldn't help myself :).
 

robins nest easter dessert


This recipe has been moved to my new blog Inspired by Familia!  Hop on over and checkout our new site and all the fun recipes, kids activities, home décor and more!  This recipe is located here.

Thursday, April 14, 2011

Easter Goodie Bag for classmates

I like to find holiday goodies to make that my kids can help me with.  Here is a fairly easy craft that your kids can be excited and proud to take to school to share with their classmates.


cute little furry tail

You will need:
paper bag
eyes
rope/string
pom pom or cotton
ribbon
glue

-cut the bag down the middle about half way
- draw a face, glue eyes
-glue pom, pom/cotton on the back for the tail
-tie ribbon where the ears stop about half way down the bag
-shape the ears by folding the ends in a bit

Don't forget to stuff it with your goodies before tying the ribbon on.

Wednesday, April 13, 2011

Featured at Foodie Friday!

Over dinner I am sharing with my husband my excitement (a little toned down for his sake) about being featured by another blogger.  With much enthusiasm I began explaining to him how the blogging world works ( I really don't know the ins and outs but I am explaining it like I wrote the manual) and as I am talking it hits me HE DOESN'T GET IT.  He was being a great listener and supportive by asking questions but the look on his face told me "just stop". 

All that to say I was estatic to discover that the very cool blog Little Brick Ranch featured my recipe on their Foodie Friday post!!

It was even more exciting because this was my very own recipe that they featured: Blueberry Lemon Cinnamon Rolls! 2nd Feature

Thursday, April 7, 2011

Taggie Elephant

Most of my sewing end up as gifts.  My love language is time and that is how I share my love to the people in my life.  So I usually make them a gift and or spend time with them.  A friend of mine was having a little baby but we didn't know the sex so I had to make a gender neutral gift.  Her nursery theme was elephants. 
I didn't use a template. 
  • What I did was use a round plate for the body and traced it on to the fabric and then I did my best on making a trunk. 
  • I used a button for the eyes and then I traced a small bowl on to the fabric for an ear and cut about an inch off so that I can get an ear look. 
  • I used brown ribbon to make the taggie feet. 
  • First I hand sewed the ear to the body.  I left a little opening to stuff it so the ear can stand out from the rest of the body since I was using the same fabric for the whole thing.
  • Sew the body together inside out.
  • Then I stuffed it and put a small piece of cardboard between the body and trunk to keep it from hanging. 
  • Now you can completely sew it.
The hardest part about making this was deciding what shape I wanted the elephant.  I decided I wanted something more abstract but child like.  This circle shape elephant really resembles a childs attempt to draw an elephant.

First Feature!!

I just discovered that I was featured on this very cool party website  Party Perfect Here ! This is exciting for me because it's my first time. So rejoice with me all of you experienced bloggers and reminence on your first!

Baby Boy Gift: Bow Tie Bib

Every litte man needs a bow tie in his life. 
Make one for everyday of the week! They are so easy you won't want to stop.
Supplies:
7 Bibs
fabric
1. Make the applique either using clip art or google a bow tie image. If your comfortable just free hand it.
2.Cut out the image and trace onto fabric.
3. Sew it onto bib. 


Buy a whole package of solid bibs and have them on hand for an adorable baby boy gift!

My adorable model!

Tuesday, April 5, 2011

Roasted Red Bell Pepper Hummus

I love me some hummus!  This is the recipe I whipped up and love!  No need for tahini! Tahini is expensive here and not easily accessible.


1 (15oz. can) Garbanzo beans, (keep liquid)
1 Tspn Garlic powder
1.5 Tspn Cumin, ground
1 Tbspn Olive oil, extra virgin
2 Tbspn Lemon Juice, fresh squeezed
1/4 Tspn salt
1 med sized sliced red bell pepper
2 garlic cloves
1 tbs olive oil

In blender, combine beans, garlic powder, cumin, olive oil, lemon juice and salt. Blend. Gradually add reserved bean liquid until dip reaches desired consistency. DON'T pour out yet.

Roastedpeppers
On a baking pan place sliced bell peppers garlic and drizzle olive oil over it and sprinkle a dash of salt over it.  I broil it until its dark on the edges or you can just bake it at 400 for 10-12min. I usually like to broil it b/c its faster.

 Now add the roasted red bell peppers, oil and garlic into blender. Blend and serve.Roasted Red Pepper Hummus with Garlic Ciabatta Croutons

For a flavor burst:
Add Sundried Tomatoes to the recipe.
Add 2tbspn of sundried tomato in oil when you add the red bell peppers to the blender for a  yummy flavor.


Monday, April 4, 2011

Lemon Cheesecake BARS using cake mix/ Melamine dishes turned Cake Pedestal


I love lemon bars but I hate the eggy taste that comes with it.  So when I found this recipe that uses a cake mix and cream cheese I knew I had to try it. 

1 bowl + 1 dinner plate + 1 cup + 1 dessert plate = Easy Cake Pedestal 
I also made the cake pedestal that is in the picture above.  You can use sticky tack or clear packing tape to keep it from tumbling and there you have an easy and cute presentation.

 Recipe from Betty Crocker or here it is:
1 box Betty Crocker® SuperMoist® lemon or yellow cake mix
1/3 cup butter or margarine, softened
3 eggs
1 package (8 oz) cream cheese, softened
1 cup powdered sugar
2 teaspoons grated lemon peel
2 tablespoons lemon juice

1 Heat oven to 350°F (325°F for dark or nonstick pan). In large bowl, beat dry cake mix, butter and 1 of the eggs with electric mixer on low speed until crumbly. Press in bottom of ungreased 13x9-inch pan.


2 In medium bowl, beat cream cheese on medium speed until smooth. Gradually beat in powdered sugar on low speed. Stir in lemon peel and lemon juice until smooth. Reserve 1/2 cup; refrigerate. Beat remaining 2 eggs into remaining cream cheese mixture on medium speed until blended. Spread over cake mixture.

3 Bake bars 23 to 28 minutes or until set. Cool completely, about 1 hour. Spread with reserved cream cheese mixture. Refrigerate about 3 hours or until firm. For bars, cut into 8 rows by 6 rows. Store covered in refrigerator.


I linked to these linky parties:
craftomaniac
more the merrier

Fabric Interchangeable Chore Chart


As a counselor one of the things I encourage parents to do is to use Chore or Behavior Charts to celebrate their success!
3 Must Do's for an Effective Chart:
  • A simple chart the child can follow and understand.
  • Rewards should be given that week if the child is younger you may  have to do 2 rewards (midweek/end of the week)
  • Always follow through on your reward
Okay I led there are 7 must do's:
  • Rewards should never be extravagant: easy & accessible.
  • LOTS of praise when task is accomplished.
  • For behavior charts once the behavior is changed take chart away otherwise it will loose its impact.
  • Make sure you clearly explain the chart and its purpose and the rewards if there are any.

For years I have used paper charts: interactive chartspotty-training charts.  They are great b/c I can change them according to the season or the behavior we are trying to improve.  I finally decided to make a cloth chart for my boys!  I tried not to use any appliques so they are not outgrown that way I don't have to make another chart.  So I went with polka dots, stripes and jean fabric. 

Here's the interchangeable component the popsicle sticks are changed according to the need.  Right now we are trying to help my child stop wetting the bed at  night so that was one of the tabs on his stick.  I went to Microsoft word and just printed out different tabs from their clipart to glue onto the sticks. 

If you were to use this as a behavior chart for a child having problems hitting you can glue a picture of a hand on a stick. If your child didn't hit anyone at school today when he gets home he can put his stick in the Monday pocket.  Depending on the childs age you can choose how many days will go by before they get a reward.  So if it's a 3yr old I usually encourage parents to go midweek to reward and then another on Friday.  Also, don't go with extravagant rewards the simpler the better as long as its something that motivates them.  It can be an actual thing or a priviledge.  Just make sure you reward him the day you said.  I always discourage parents from big rewards like I will take you to McD's or I will buy you that train set you have always wanted.  The bigger the harder it is to follow through.  You may have been able to take him to McD's on Wed. but when Friday came you had a lot going on so you postpone it til Sat. then its changed to Sunday and before you know it your child is no longer interested in your chart.

I linked up with:
http://diyhshp.blogspot.com/

Friday, April 1, 2011

Baby Hat from Sweater

Old Stained sweater from my 6yr old

Trace onto sweater leaving an inch for the hem

Baby hat!