I love to have fun with paper, food, paint, music and events and just being creative in all of it. However, I don't feel the need to be a perfectionist nor a professional in any of my creations. I wish I could have a blog JUST about the art of cooking, photography, sewing, art, mothering, jewelry making, card making, dancing, gardening, deep spiritual thoughts, decorating, poetry, party planning, baking.... and the list goes on but I can't. I don't think I was created with the ability to focus on one task. I like all of these hobbies layed out before me and the freedom to pick whatever I choose depending on the mood or time I have.

Wednesday, May 18, 2011

Fish Tacos Mexican Style

You know how you peruse a magazine or a blog and you come across an ad or recipe that is mouth watering.  From that point on your hooked you have to try it. Well, I saw a Fish tacos recipe on someones blog and since then I have wanted to try some.  So last night I satisfied my craving.  Apparently, you can buy them in Hawaii, Mexico, Ecuador, San Diego and I am sure in many more coastal areas according to my friends who have been in those areas. 

Fish Tacos Mexican Style

6-8 white fish meat I used a bag of frozenTilapia
1/4 cp of oil
1 pk of Taco seasoning Chipotle flavor I used Taco Bell brand
2 tbsn of garlic paste
1 tspn of salt
2 limes
12 Flour or Corn tortillas

1. Mix all the fish taco ingredients (minus fish) and juice the limes. Mix well. This will be your marinade.
2. Cover the tilapia in marinade and let sit for 10min.
3. Pour marinade and Tilapia into a hot pan.
4. cook until fish is done about 5-8 min.
5. I like my tortillas heated on a comal (griddle). So if you have one use it but make sure they don't get brown otherwise you may end up with crunchy tortillas that you can't bend. As you can see in the picture above this happened to me. I just cut them up and put them in a baggie to enjoy with dip later. Or you can make fish tostadas instead of tacos. Tostadas are pretty much hard shell tortillas where tacos are soft shell tortillas. That was some free tortilla facts for ya!
6. Put fish inside a tortilla and top it with the avocado sauce and pico de gallo.
Pico de Gallo
1/2 onion diced
1/4 cp of cilantro diced
1 tomato diced
1 lime
1 jalapeno diced (optional)
salt

Mix all the ingredients above and juice the lime.  Top off your tacos with pico de gallo!

Avocado Sauce
1/2 cp of sour cream
1 whole ripe avocado
2 tbspns of taco seasoning
hot sauce (optional)
salt

1. Take your soft avocado and slice a wedge into it so you can gut it with a spoon.  This should be pretty simple if your avocado is soft enough.
2. Add the rest of the ingredients and mix. Put over tacos and then add pico de gallo.

We had this with Strawberry Lemonade Daquiri and Mexican rice!  ENJOY!!

Monday, May 16, 2011

Going Old School with Hostess Cupcakes

Hostess Cupcakes, these words take you back to your childhood when you could enjoy more than one cupcake and not worry one bit about your waistline.  My husbands 6th grade class was planning a surprise party for him and I brought these along.  They loved them! One little kid asked me for the recipe, LOL.

Hostess chocolate cupcake has been around since 1919, it wasn’t until 1950 that they added the cream filling and signature squiggle. I forgot to make the signature squiggle on mine, notice below.


You will need:
Box of Chocolate Cake mix
1cp of sour cream

For Chocolate Ganache frosting
-4 oz of chocolate chopped
- 1/4 cp of heavy cream

Filling:
6 Tbsp. butter, softened
1 1/2 cups confectioners’ sugar
3/4 cup Marshmallow Fluff (see below for instructions if you live in a part of the world where you can't find this)
1 1/2 -2Tbsp. heavy cream


1. Follow all the cake directions on box and add 1 cup of sour cream for extra moist cupcakes and bake.
2. In a bowl mix all of the filling ingredients, start with 1.5 tbsp of cream. If the consistency of the filling is not smooth enough add all of the 2tbsp of heavy cream.
For those who can't buy this in a jar Marshmallow Fluff: Grease a microwave safe bowl with shortening. Pour 1 cup marshmallows in bowl. Pour 1 tablespoon water and 1 teaspoon extract over marshmallows. Heat in microwave until marshmallows puff a bit, about 20 to 30 seconds. Stir well until fully melted and smooth and runny. The extract is OPTIONAL.
3. Start piping in your filling into each cupcake. My piping was a disaster because my bag busted in the middle of it all.  So I tried making one using a ziploc bag and it was super messy. I don't think its supposed to be this complicated.           
4. Heat the heavy cream in a quart-sized, microwavable container and microwave for 3 to 4 minutes on high, or until it just begins to simmer; be careful not to allow the cream to boil over. Pour the cream over the chocolate and let stand for 2 minutes.  Whisk it until its smooth like a glaze. 

5. Smooth the Chocolate Ganache over the cupcakes and let them cool and then add the squiggly lines, 7 to be exact as shown on the first picture. Use the filling for the squiggly lines or white writing icing.


 TIP: My cupcakes were pretty puffy on top so I cut the tops off and I will use it for cake pops later.  I will also add to that mix frosting, freeze them for 5min and then shape them into balls and pop them back into the freezer until you need them. Once your ready to use them dip them in chocolate. 


Friday, May 13, 2011

Frilly Fru- Fru Chic Projects

I have always liked to "brag" on how I am not a frilly fru-fru chic but I must say after putting these pictures in this post I am not fooling anyone on my current taste of decor. 

Can any of you relate to an over achiever thought processer but pretty average when it comes to the output?  Both of my hands are going up and if my husband was here his would be going up for me :). I have so many wonderful projects I want to tackle for our new home but not sure how many I will actually get to since its the end of the school year, we in process of moving and then we are going on our first furlough in 2.5yrs. 

Urban Outfitters Duvet this is too big for my suitcases and my budget so I would like to attempt making it. I can't decide what style I like but the ruffles all over is going to be TIME CONSUMING.
Urban Outfitters Ruffled Bed Covers

I am working on this Faux Capiz Chandelier


I desperately need to make curtains for our home because we  have tons of BIG windows and they are outrageously priced  here.  I need to get my sewing game on. They make homes here with BIG windows which I don't mind because I like natural light but can be overwhelming if your making them.
Semi ruffled curtains or even with rosettes but I can't decide. These are shown as shower curtains but I want to make them for our living room window.
  Anthropologie

I can't wait to show you the finish projects!  Gotta go sew!!

Morrocan Style Chicken-Crescent Casserole

Moroccan-Style Chicken-Crescent Casserole Middle Eastern cuisine does me good especially when its easy to make! I came across this recipe and had to try it.  I adapted this recipe from Betty Crockers website.  I had a whole chicken that I needed to use up so I used shredded chicken instead.

Ingredients
1 tablespoon olive or vegetable oil
6 boneless skinless chicken breasts (about 1 1/2 lb), cut into bite-size pieces or shredded chicken
1/2 cup chopped onion
1 can of drained chick peas/garbanzo beans
1/2 cup sliced carrot
2 cans (14.5 oz) diced fire-roasted or regular tomatoes, undrained
1 tablespoon tomato paste
3 tablespoons chopped fresh cilantro
1 1/2 teaspoons paprika
2 teaspoon salt
3 teaspoon ground cumin
2 teaspoon ground cinnamon
1 teaspoon ground red pepper (cayenne)
1 can (8 oz) Pillsbury® refrigerated crescent dinner rolls (8 rolls) They don't sell this here so I used pie crust
1 egg, beaten
1 tablespoon sliced almonds
1/3 cp of raisins

1 Heat oven to 375°F. In 12-inch skillet, heat oil over medium-high heat. Add chicken, onion and carrot; cook and stir about 7 minutes or until chicken is browned and no longer pink in center. Stir in tomatoes, tomato paste, parsley, cilantro, paprika, salt, cumin, raisins, cinnamon and red pepper. Cook and stir about 5 minutes or until thoroughly heated
 
2 Into ungreased 11x7-inch (2-quart) glass baking dish or 9 1/2- or 10-inch deep-dish pie plate, pour hot chicken mixture. Immediately unroll dough over chicken mixture; pinch edges and perforations to seal. Brush dough with beaten egg; sprinkle with almonds.


3 Bake 18 to 25 minutes or until deep golden brown. If desired, garnish with fresh cilantro.

Thursday, May 12, 2011

Originality

Originality is the aspect of created or invented works by as being new or novel, and thus can be distinguished from reproductions, clones etc...  An original work is one not received from others nor one copied based on the work of others. Wikipedia

One of the things I enjoy most is painting on canvas.  I listen to music, or read something or sometimes just observe nature and I am inspired and I need a blank canvas to journal on with a plethora of hues on my color pallette at my disposable ready to make history. I am exaggerating a bit but thats how I feel.  The result: a fresh unconventional "master piece" and that is important to me but let me tell you crafting novelty is hard. Now that we have access to the web it is so difficult to be innovative.

I usually have random thoughts and ideas through out my day.  I filter them and then decide which ones I have time for and in the mood to create and which ones are going to stay as ideas in my head.  I so proudly post my "novel" idea/ creation to share with the cyber world but to my dismay I discover that someone in S. Africa, Croatia, Alaska etc... already came up with that idea and in reality mine is not so original. It was ORIGINAL in my mind I promise :) but someone else somewhere in the ends of the earth already had my inspired thought.
There is wonderful good to this because it makes life easier when I don't have the time or brain power to come up with something original.  Or to even know that there are so many inspired women and men out there making their visions and inspiration a reality and we have access to them even if I can't pronounce the city they live in and this is all very beautiful.

Sometimes though it feels like my parade got rained on thats more of my selfish thinking coming out.  Don't get me wrong I have and my family has benefitted from the many of my UNORGINAL meals, house decor, wardrobe and crafty ideas I gather from the web.  I LOVE this at my fingertips knowledge!

Just thinking outloud into the cyber world. Hey maybe someone else has already written this post :)

Monday, May 9, 2011

Easy Peasy 5 minute Bowties

Making this made me feel like Julie Andrews from Sound of Music except I wasn't using curtains I was using a dress thats too big.  I have been wanting to cut this dress down to a smaller size and finally the sewing machine was out when needed.  Now that it was smaller I had small remnants of this fabric and then the idea came. 

So why not bowties for the boys? I was wearing this dress to a Mothers Tea put on by my sons class. It took me 5 min. I didn't have a lot of time because like most of my ideas they pop into my head when I can't possibly manage to fit another thing in my hectic day. You and I both know we mothers have lots of practice at squeezing one more thing in, so I did.
You need:
Fabric
Ribbon
Velcro

1. You need to decide  how big you want the tie. Cut a strip of fabric fold in the outer edges then gather both ends down the middle. Cut gray ribbon the same length and then some for the width.
2. Sew around the rectangle and down the middle where the ends of both side came together. You can do it by hand but I used a sewing machine since it was out.

 3. Gather your fabric in thirds like here and that is how your bowtie will gather.
 4. By hand I put a couple of stitches in the middle to keep the gathered material in place.
 5. Then I put a couple of stitches on the ribbon going around the bow.


I sewed this lone on to his onesie!

Everyone thought I made this dress since my kids had matching bows to go with it.  I didn't bother to inform anyone that this was not the case.  My older son got  his bowtie around his neck. I measured his neck and cut ribbon that size and stitched the ribbon on one side and velcroed the other end.  I wouldn't use adhesive velcro. I tried it  because I was in a hurry and it didn't work quite right. 

Tuesday, May 3, 2011

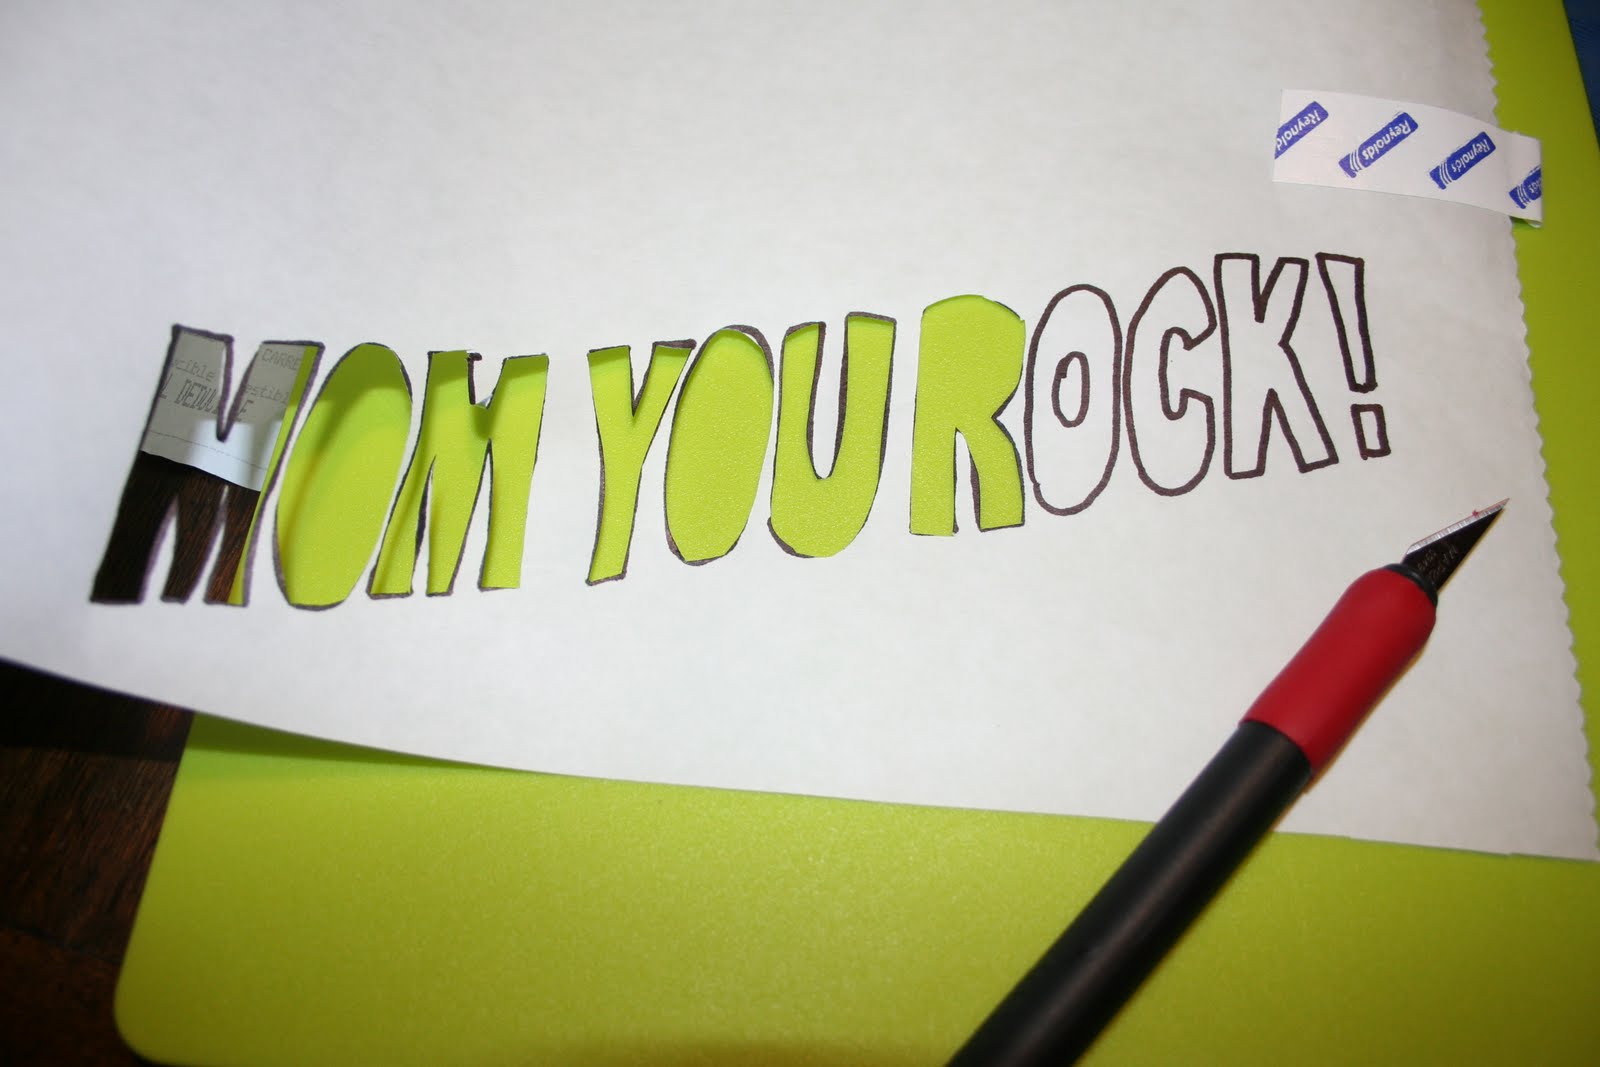
Mom Rocks! DIY Graphic Tee

My husbands 6th grade class will be making these for their moms! Just find the art you want and print it out the size you want it on the shirt. We used clipart from Word and used Text Art from Word for the letters.
You will need: Freezer Paper, Fabric paint, Blade, Picture of your art, sharpie

 1. Trace your picture onto the non shiny side of the freezer paper.
2. With the blade trace around the drawing. You will only be using the negative space.  Lay the art on the shirt.  3. Place a hot iron over it and it will stick to shirt.

4. Now you can start the fun painting!

5.  Once your done peel off the freezer paper.

There you have it!

Proud son!!


Above are some more Freezer Paper Painted Shirts from the 6th Grade class, that middle one says #1 MOM.

Monday, May 2, 2011

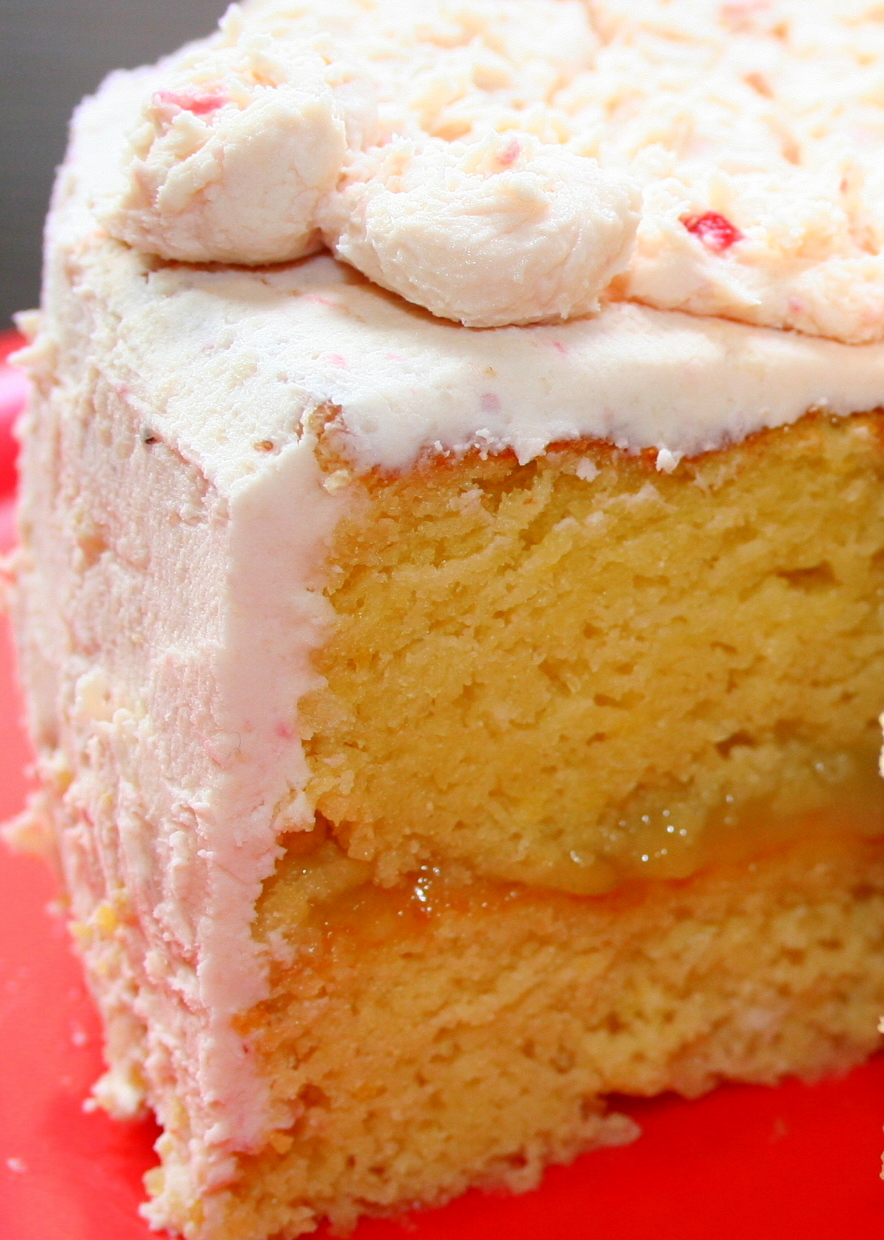
Strawberry White Chocolate Frosting Rosettes Lemon Cake


I have mentioned this before but working with chocolate as a base for frosting is absolutely fabulous especially if you want something moldable. It far surpasses fondant in flavor.

Strawberry White Chocolate Frosting:
5 strawberries w/o stems
1 tbspns of water
12oz of white baking chocolate
2-3 cps of powdered sugar
1/2 cp of soft butter

Puree strawberries w/ water in a blender. Set aside.
In a saucepan melt chocolate. Keep stirring until its melted over low heat. Set aside for it to cool.
In a large mixing bowl whisk butter until its smooth. Add cooled but still melted chocolate in with butter slowly add  powdered sugar and then add 3tbspns of pureed strawberries.  Keep adding powdered sugar until its the thickness you want. 

Making Rossettes:
It will be a little sticky so be prepared to lick your fingers when your done.  Cover cake smoothing out frosting out until its flat and smooth. Then grab a small amount and shape into balls and place over cake.  Once the cake is covered in balls then use a toothpick to swirl the top of each ball to give it a rossette look. 

Working with White Baking Chocolate for frosting:
This type of frosting is absolutely delicious!  It's pliable and I would rather work with this than fondant though you would use Chocolate clay for more of a fondant feel than Chocolate frosting. It hardens so you can't wait too long to mold it or spread it otherwise you will need to add milk to get it back to the right consistency.

Lemon cake
Lemon boxed cake
1  cp of sour cream
1 box of vanilla or lemon pudding
lemon zest

Follow directions on cake box and then add sour cream, lemon zest and pudding to the mix. Bake as directed on box. Pour into 2 round cake pans and bake.  Let them cool and then put lemon curd filling in between.

Lemon Curd filling
Zest of 2 lemons
½ cup lemon juice
¼ cup granulated sugar
1 egg + 1 egg yolk
In a saucepan, stir together the lemon zest, juice and sugar and bring to a simmer over medium heat. In a small bowl, whisk together the egg and egg yolk. Whisk the lemon mixture into the eggs to temper them. Scrape the mixture back into the saucepan and place over medium heat, whisking constantly until it thickens, about 5 minutes. Remove from the heat, and let cool completely.

Monday, April 25, 2011

In the mood: Strawberry Cheesecake Pancakes

Cheesecake PancakesPancakes are something I enjoy making. They can be a dessert, snack, meal.  These Strawberry Cheesecake Pancakes really satisfies that sweet tooth and doesn't have all the calories of an actual piece of Cheesecake.


2 cps of Pancake mix 
4 oz cream cheese
1/2 cup graham cracker crumbs
1/4 cup sugar
1 cup milk
2 eggs
CREAM CHEESE GLAZE:
4 Tablespoons butter
2 ounces cream cheese
3/4 cup powdered sugar
1/2 teaspoon vanilla extract


1. Slice the cream cheese lengthwise into four pieces. Place on ungreased cookie sheet; cover and freeze 8 hours or overnight.
2 Brush griddle or skillet with vegetable oil, or spray with cooking spray; heat griddle to 375°F or heat skillet over medium heat.
3 Cut cream cheese into bite-size pieces; set aside. In large bowl, stir pancake mix, graham cracker crumbs, sugar, milk and eggs with whisk or fork until blended. Stir in cream cheese.
4 For each pancake, pour slightly less than 1/3 cup batter onto hot griddle. Cook until edges are dry. Turn; cook other sides until golden brown.
5 Top pancakes with glaze mixture and strawberries. Or you can use strawberry syrup.

I was inspired by Spring 2010 winner on bettycrocker.com.  I adapted the recipe.


If your mornings are like mine your always looking for quick and easy breakfast.

linked to:
http://ladybug-blessings.com/
http://funkypolkadotgiraffe.blogspot.com/

Featured in these Wonderful Blogs


Thanks ladies for sharing the Love!

Wednesday, April 20, 2011

Mod Lunch Clutch

This Mod Lunch Clutch is not only adorable but it is also going green!   Recycle your empty wipes bag and throw out those brown paper lunch bags.  The wipes container are wipeable on the inside so if you have spillage it can easily be wiped down with a wet cloth. You may want to buy wipes that are not scented so the bag doesn't have a baby scent, that is unless you like the baby scent :). 

What you will need:
-Empty Wipes bag
-Craft glue
-scissors
-various colored ribon

1. I applied the orange polka dot ribbon on the side by piercing a hole on the upper corner with scissors. I ran the ribbon through it and then tie a knot at the end and hand stitched it in place.


This super easy craft starts with glueing the ribbon onto the wipes bag.  Apply glue and press ribbon over it.
2. If you want the ruffled look than fold in the ribbon and then press it down on the glue. 

3. Do this until the whole bag is covered. 

Voila! Your done in less than 20min.
I made another one here

Wednesday Link ups

Whatever Goes Wednesday

Your Way Wednesday
733blog
womenwhodoitall