I love to have fun with paper, food, paint, music and events and just being creative in all of it. However, I don't feel the need to be a perfectionist nor a professional in any of my creations. I wish I could have a blog JUST about the art of cooking, photography, sewing, art, mothering, jewelry making, card making, dancing, gardening, deep spiritual thoughts, decorating, poetry, party planning, baking.... and the list goes on but I can't. I don't think I was created with the ability to focus on one task. I like all of these hobbies layed out before me and the freedom to pick whatever I choose depending on the mood or time I have.

Tuesday, June 14, 2011

Strawberry Pretzel Pie

Judy Tarner from Clinton, Tennessee won the State Fair Pie competition with this one.

Strawberry-Pretzel Pie

Our family enjoyed this mildly sweet but packed with fat dessert :).
Ingredients:
1
box Pillsbury® refrigerated pie crusts, softened as directed on box
1
egg white
1
cup crushed pretzels
1/4
cup sugar
6
tablespoons butter, melted
2
packages (8 oz each) cream cheese, softened
1 1/2
cups sugar
1
container (12 oz) frozen whipped topping, thawed
1
bag (16 oz) frozen unsweetened strawberries, partially thawed, sliced
1
cup boiling water
1
box (8-serving size) strawberry-flavored gelatin
 
1. Heat oven to 450°F. Unroll 1 crust in 10-inch glass pie plate or 9 1/2-inch deep-dish pie plate. Trim outside edges. Prick bottom and side with fork. Use second pie crust to put a braid on outside rim of crust. Cut crust into 1/4-inch strips, and braid three strips at a time. Brush egg white on crust edge and place braid on, pushing in slightly.
  • 2. Combine crushed pretzels, 1/4 cup sugar and the melted butter. Press into bottom pie crust. Bake 10 to 12 minutes or until crust is golden brown. Cool.

  • 3. Stir together cream cheese and 1 1/2 cups sugar until sugar is dissolved. Carefully fold in whipped topping. Spread in cooled crust, reserving 2 cups filling to decorate pie. Place a flat layer of strawberry slices on top of filling. Mix boiling water and gelatin (with a few ice cubes) to make about 1 2/3 cups gelatin. Thicken slightly and pour over strawberries on pie. Refrigerate pie 8 hours or overnight.

  • 4. Decorate outside edge of pie with 2 cups reserved cream cheese mixture.

  • If you are short on time, this pie can be made without the decorative crust edge.

    Picture and recipe is from Pilsbury website.

    faux Capiz Shell Chandelier

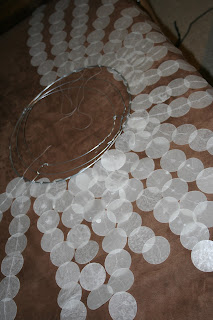
    This was the longest craft project I have ever worked on, really.  I worked on it with a friend otherwise it would never had been completed.  I highly recommend working on long, tedious projects like these with someone. 

    This picture is from West Elm where I got my inspiration from but quickly was uninspired when I saw the price.  The Little Apartment is the tutorial I semi followed and got my hopes up again that I could own one of these if I slaved over it for the next 3 months (exaggerating).

    I did mine a little different from the tutorial on The Little Apartment. I made my wire base on one level not using hanging baskets here.  I wanted to look more like West Elms with the one wire base instead of multiple.  I also didn't want mine as long so hanging baskets are good if your making it super long.
    Material:
    Iron
    Wax paper
    white thread
    craft glue
    wire
    circle cutter

    1. Cut your wax paper the size you want. You need to cut 2 pc the exact size.
    2. Iron those 2 pieces together.
    3. Use your circle cutter to go crazy on making circles.  I did this while I watched a movie and sometimes my hubby was kind of enough to help. I made at least 150 circles. If you find that you need more make them as you go.
    4. Figure out where you want your chandelier to hang and how many levels.  Mine has 3 diffent legths but by base is only one level. I didn't want it to hang too low so I measured my white thread into 3 different lengths.
    5. Work from the inside out.  I didn't and it got complicated. So I started with my longest strand of thread and started to glue the circles on with some overlap.  Just put one dot of glue on one end of each circle. You want each one to dangle. You can use hot glue gun if you don't have good craft glue to work with.
    6. I got into a groove and figured out how to quickly glue them on if I put my fingers in between each circle and glued.
    7.  Keep your circles seperate until they dry. Otherwise you will have a mess and lots of circles and strands sticking together. It happened to me.

    8.  Once you make at least 10 strands start attaching strands to the inner circle. I didn't I started with the outer circle first and as I said before it was so much harder doing the inner circle last.
    9. I made my circle wire base from wire or you can use a wire basket or hanging basket.
    10.  I used a lamp to help me attach the strands once I got a lot on them.
    Here is the finished product!

    Saturday, June 11, 2011

    Easy Lemon Ricotta Pancakes with Fruit


    Do covet over those fluffy pancakes you see on the cover of your pancake mix?  Well, covet no more because with my secret ingredient below you will for sure have some fluffiness and yumminess!

    I needed to use up all of the ricotta cheese package because we don't have a fridge to store it in so last night I made my famous Gringo pizza and today I made this.  To be honest I had  no idea what this would turn out like but it was GOOD!

    Ingredients
    Pancake Box mix or if you prefer to make it from scratch go for it
    3/4 cups of Ricotta cheese
    1 tb of Lemon flavoring
    2 tb of Lemon Juice
    Lemon zest
    fruit of your choice to top them with (strawberries, blueberries, rasberries or all 3)

    1. Folllow pancake box directions and then add the cheese, flavoring and juice.
    2. Cook them.
    3. Top with fruit and lemon zest.
    I used strawberries or you can top them with blueberries.  Super EASY!

    Our family LOVED them!

    Thursday, June 9, 2011

    Milk and Cookies

    Who said milk and cookies can't make everything better?

    Oatmeal Cranberry Chocolate Chunk Cookies
    Recipe from Giada De Laurentiis
    1 cup all-purpose flour
    3/4 teaspoon ground cinnamon
    1/2 teaspoon baking powder
    1/2 teaspoon baking soda
    1/2 teaspoon fine sea salt
    1 stick unsalted butter, at room temperature
    1/2 cup light brown sugar
    1/2 cup sugar
    1 large egg, at room temperature
    1/2 teaspoon pure vanilla extract

    2 cups old fashioned oats
    1 cup dried cranberries
    1 (4-ounce) 60 percent cacao bittersweet chocolate bar (recommended: Ghirardelli), chopped into 1/4-inch chunks (semi-sweet chocolate chips are an acceptable substitute)
    • Put an oven rack in the center of the oven. Preheat the oven to 350 degrees F. Line 2 baking sheets with parchment paper or Silpat mats. Set aside.
    • In a medium bowl, whisk together the flour, cinnamon, baking powder, baking soda, and salt. In a stand mixer fitted with a paddle attachment, beat the butter and sugars together until light and fluffy, about 1 minute.
    •  Add the egg and vanilla and beat until smooth. With the machine running, gradually add the flour mixture. Add the oats, cranberries and chocolate chunks (or chocolate chips). Mix until just incorporated (dough will be stiff).
    • If you would like to make a dozen large (Starbucks-size) cookies, use a 4-oz cookie scoop which holds about 1/2 cup of dough. If you want more cookies, use a smaller scoop. Using a cookie scoop, scoop slightly rounded mounds of the dough into balls. Arrange balls of dough, spaced 2-inches apart, on each baking sheet. Flatten the tops of the cookies with a damp hand and bake until the cookies are slightly golden on the edges, about 13 minutes. Allow the cookies to cool on the baking sheet for 20 minutes before serving.

     The recipes says it makes 30 cookies I have no idea how she got 30 cookies.
    I used white chocolate chips, mmmmm!

    Wednesday, June 8, 2011

    BLT Pasta Salad

    My no fridge meal for dinner is this Bacon, Lettuce and Tomato Pasta Salad.

    For those of you wondering why I am making no fridge meals, we are out of a fridge for 2weeks.  Now I have an excuse to cook all the bacon in the package and hmmmm maybe eat it all or I mean put in foil to serve for breakfast. 

    BLT Pasta Salad from Food.com
    Ingredients
    1 cup mayonnaise or 1 cup salad dressing
    1/4 cup lemon juice concentrate
    2 teaspoons sugar
    2 teaspoons chicken flavor instant bouillon
    1 (7 ounce) package rotini pasta or 1 (7 ounce) package other pastas, cooked and drained
    8 slices bacon, cooked and crumbled
    1 large tomato, seeded and chopped
    1/4 cup green onion, sliced
    4 cups lettuce, thinly sliced

    1. Combine the first 4 ingredients.
    2. Add in the rest. 

    Serve cold unless you dont' have a fridge :).

    Tuesday, June 7, 2011

    A Good Meal

    Many of you started following my blog and others because you love to cook.  I wanted to share with you how a good meal blessed me tremendously.  When I say "good meal" you may have lots of amazing recipes come to mind but what made this meal "good" was that someone shared their amazing meal with us when we really needed it. 

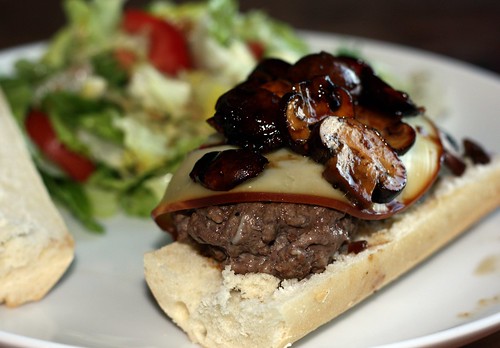
    I had no idea that I needed to stop staring at the piles and piles of boxes sitting on my floor. Trying to stare them into submission and get them to organize themselves.  I had no idea that I needed to sit with friends for at least an hour and not think about where things need to go and what else I need to do.  I had no idea that Marsala Mushroom Burgers are so good. I had forgotten how healing it is to have someone else cook for you.  How healing it is to just sit and laugh and enjoy your friends company. 

    I mentioned earlier in another blog that we are MOVING (it's capitalized because I am speaking in a loud voice holding my hair). To add to our moving stress we have the challenge of trying to cook with out a fridge.  We won't have a fridge for the next 2 weeks.  Therefore, cooking has been very interesting and not fun. 

    So as you plan another amazing meal that you all share in your amazing blogs don't forget that you can use this gift, skill, love to serve someone else. Don't wait til you get your kitchen repainted or a new dining room table etc... we can come up with lots of reasons why not to have company.  Our friends that had us over tonight moved not to long ago from another country and their furniture had not arrived. We dined on their small dining room table sitting on lawn chairs in their large empty home, why, because they were able to get over themselves inorder to reach out and help someone else.  And I am so thankful for that.

    This is what we have been up to!!


    Do these words pop into your head when you see this picture: chaos, work, work, work, tired, exhausted, back pain, mess, excited, money, money, money, adjusting......... I am sure you all could come up with your adjectives to add to this.

    We moved to a house with a YARD!!! Praise the Lord for green space.  We live in a big city and the only green space you own is the potted plant in your window sill.  We enjoyed our aparment living but were glad to be back in an affordable and spacious house where our enegetic boys can run around freely inside or outdoors!

    In light of the adjectives above we are very thankful for this move!

    A move also means lots of decorating home projects for our future posting.

    Wednesday, June 1, 2011

    Grilled Ham Gouda Cheese with Caramelized Onions and Roasted Tomato Mayo Sandwich

    I must warn you that your mouth will be bursting with flavor when you try this sandwich! I found it on my search for recipes made with Gouda cheese here or it's below:
     
    Caramelized Onions:
    • 1 tablespoon unsalted butter   
    • 1 tablespoon olive oil
    • 1 large Spanish or sweet (Vidalia) onion, halved and thinly sliced
    • Salt and freshly ground black pepper

      
    Roasted Tomato Mayonnaise:
    1 plum tomato, halved and seeded or 2 sun-dried tomatoes in oil, drained and patted dry
    1 tablespoon canola oil (if roasting tomato)
    Salt and freshly ground black pepper
    1/2 cup Hellmann's mayonnaise
    2 cloves garlic, chopped
    2 teaspoons fresh thyme leaves or 1/2 teaspoon dried thyme
     
    Sandwich:
    • 8 slices good quality white bread (Pullman loaf) cut into 1/4-inch thick slices
    • 1 1/2 cups grated Gouda cheese
    • Caramelized onions
    • 8 slices prosciutto, sliced about 1/8-inch thick
    • 8 tablespoons unsalted butter, at room temperature

     
    Directions
    Caramelized Onions:
     
    Heat the butter and oil in a medium saute pan over medium heat. Add the onions and cook, stirring occasionally, until golden brown and caramelized, season with salt and pepper.
     
    Roasted Tomato Mayonnaise:
     
    1. Preheat the oven to 375 degrees F. Place the tomato in a small dish or baking sheet, drizzle with oil and season with salt and pepper. Roast until the tomato is very soft and golden brown, about 20 minutes. Remove from the oven and let cool slightly.
     
    2. Put the mayonnaise, tomato, garlic and thyme in a food processor and process until smooth, season with salt and pepper. Scrape into a bowl.

     
    Sandwich:
     
    1. Place 4 slices of the bread on a flat surface, divide half of the cheese among the slices. Top the cheese with 2 slices of prosciutto then top the proscuitto with some of the onions and the remaining cheese. Place the 4 remaining slices of bread on top to make four sandwiches. Butter the top of the bread using half of the butter.
     
    2. Preheat a cast iron pan or cast iron griddle over medium heat. Place the sandwiches in the pan, butter-side down (may need to do in batches) and cook until lightly golden brown. Spread the remaining butter on the bread facing up, then flip and continue cooking until the bottom is golden brown and the cheese has melted. Serve with roasted tomato mayonnaise on the side.


    I used ham deli instead of proscuitto, normal butter and sundried tomatoes.  I used kaiser rolls. 


    Cucumber and Tomato Salad

    Mexican Cucumber and Tomato Salad!  Actually, I am not sure if this is really Mexican but my mother grew up eating this and she often made it in the summer for us. I guess that counts to call it Mexican :).  I love the crisp,cool taste of this simple salad in the hot summer. 

    Ingredients:
    ■2 large ripe tomatoes, seeded and chopped
    ■1 cucumber, peeled if the skin is bitter, seeded and chopped
    ■1 small red onion, chopped
    ■juice of 1 lemon, strained
    ■salt and freshly ground black pepper, to taste

    Mix all the ingredients together.

    Don't be fooled by this simple recipe it really is good!

    Finally made Panzanella

    I had very little time to make this because my husband had to run out the door to direct the 6th grade play so I didn't have time to follow a recipe.  So I just did my own thing based on the 4 or 5 recipes I had looked at before.  In this post I share some of those recipes.

    Ingredients
    3 tbspns olive oil
    1 small French bread cut into cubes (6 cups)
    1 teaspoon kosher salt
    2 cps of cherry tomatoes halved
    1 cucumber, unpeeled, sliced
    1 red bell pepper, seeded and cut into cubes
    1 green/ yellow bell pepper
    1/2 red onion, cut in half and thinly sliced
    20 large basil leaves, coarsely chopped
    1/4 cp of carrots chopped
    1/2 cp of Gouda cubed
    black pepper to taste

    vinaigrette

    4 tbspns of olive oil
    3 tbspns of balsamic vinegar
    1 tbspn of garlic paste


    1. Heat the oil in a pan. Add the bread and salt; cook over low to medium heat, tossing frequently until nicely browned. You may need to add more oil I couldn't quite get the bread to look nice and toasty like all the post on this recipe make it look.  Mix in a large bowl bread, cheese and all the vegetables.

    2. Mix all the vinaigrette ingredients in a small bowl and then pour over bread and veggies mix.  Add salt and pepper as needed.

    Picture from Farmscape Gardens