 This picture is from West Elm where I got my inspiration from but quickly was uninspired when I saw the price. The Little Apartment is the tutorial I semi followed and got my hopes up again that I could own one of these if I slaved over it for the next 3 months (exaggerating).
I did mine a little different from the tutorial on The Little Apartment. I made my wire base on one level not using hanging baskets here. I wanted to look more like West Elms with the one wire base instead of multiple. I also didn't want mine as long so hanging baskets are good if your making it super long.
Material:
Iron
Wax paper
white thread
craft glue
wire
circle cutter
1. Cut your wax paper the size you want. You need to cut 2 pc the exact size.
2. Iron those 2 pieces together.
3. Use your circle cutter to go crazy on making circles. I did this while I watched a movie and sometimes my hubby was kind of enough to help. I made at least 150 circles. If you find that you need more make them as you go.
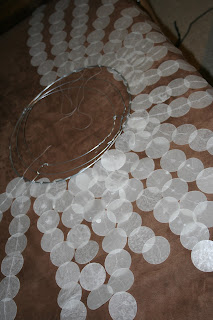
4. Figure out where you want your chandelier to hang and how many levels. Mine has 3 diffent legths but by base is only one level. I didn't want it to hang too low so I measured my white thread into 3 different lengths.
5. Work from the inside out. I didn't and it got complicated. So I started with my longest strand of thread and started to glue the circles on with some overlap. Just put one dot of glue on one end of each circle. You want each one to dangle. You can use hot glue gun if you don't have good craft glue to work with.
7. Keep your circles seperate until they dry. Otherwise you will have a mess and lots of circles and strands sticking together. It happened to me.
8. Once you make at least 10 strands start attaching strands to the inner circle. I didn't I started with the outer circle first and as I said before it was so much harder doing the inner circle last.
9. I made my circle wire base from wire or you can use a wire basket or hanging basket.
10. I used a lamp to help me attach the strands once I got a lot on them.


Well it paid off because it is so flippin cute!
ReplyDeleteThanks! I am looking forward to hanging it up
ReplyDeleteThis is a fabulous tutorial. I love the look of it. Please stop by www.laughloveandcraft.com and link up to my Share the Wealth Wednesday Link Party! I'm your newest follower!
ReplyDeleteVERY cool!!
ReplyDeletehttp://ashtonscraftycreations.blogspot.com/
very cute. come link it up with us today at finecraftguild.com as our readers will love to find you!
ReplyDeletethx chicas!
ReplyDeleteWhat a beautiful idea! You did such a good job. Thanks for the inspiration
ReplyDeleteWow, I'm so impressed & I'd love to try this sometime! I'd love it if you want to link it up to my party & then I'd like to feature you on Friday!
ReplyDeleteWarmly, Michelle
Bethany thanks!
ReplyDeleteMichelle, I have been on furlough so I just saw this. I will try to pop over after this and link up. Thanks for the feature always flattering!
Mari, It's my pleasure to feature this in my Fab Friday Favorites post tonight. Thanks for linking it up & feel free to take an "I Was Featured" button if you wish.
ReplyDeleteWarmly, Michelle
Michelle thanks so flattered!
ReplyDeleteWow, a lot of work but it looks incredible! Well worth the effort.
ReplyDelete