http://janedeereblog.blogspot.com/
http://bacontimewiththehungryhypo.blogspot.com/
Sunday
http://www.iheartnaptime.net/
http://www.flamingotoes.com/
http://niftythriftythings.blogspot.com/search/label/nifty%20thrifty%20sunday
http://www.bystephanielynn.com/2011/10/sunday-showcase-party-with-bellingham.html
Friday, September 30, 2011
Thursday, September 29, 2011
Pizza on a Stick

1 1/2 c. warm (105-115 degrees) water
1 Tbsp. sugar
1 Tbsp. yeast
1 tsp. salt
2Tbl. Olive Oil
3-4 1/2 c. flour
1/2 c of dice pepperoni
1/2 c of mozzarella
Parmesan
Italian Seasoning
Garlic seasoning
Wooden Skewers
Melted butter
Pizza sauce for dipping
In a large bowl, combine water, sugar, and yeast. Let stand for 10 minutes or until yeast is bubbly.
Add salt, olive oil and stir. Add 1 1/2 c. flour and mix well. Add pepperoni, italian seasoning, parmesan and mozzarella. Gradually add all the flour until dough starts to pull away from the sides of the bowl and it barely sticks to your finger.
Spray a bowl with cooking spray and place dough in the bowl.
Cover and allow to rise for 20 minutes.
Remove from bowl and place on a lightly floured surface. Cover a cookie sheet with foil. Roll into a rectangle and cut into 12 strips with a pizza cutter. Brush melted butter over it and sprinkle Garlic seasoning over it.
Roll dough around skewer and bake 425 for 15min. Brush some more melted butter on it and sprinkle paremesan over it. Dip in pizza sauce.
This makes about 18 large Pizza sticks.
Icecream cake in a Cone dipped in Chocolate

You will need:

- Cake smashed up (it can be frosted or not)
- Ice cream
- Frosting using a pastry tube
- Chocolate for melting
- styrofoam cups to hold cones
First:


What to do with LEFT OVER cake?
I stick mine in a ziploc bag and smash it!
 I do one of two things with it:
 Cake balls for this I shape them into balls and and freeze them that way until I am ready to dip them in chocolate.
 Cupcake in a Cone dipped in chocolate for this I just leave the smashed cake in the bag and scoop the cake into each cone, frost it and freeze then dip it in chocolate.
Pictures from Austin 360 and Cake or Something Like that
 Cake balls for this I shape them into balls and and freeze them that way until I am ready to dip them in chocolate.
Pictures from Austin 360 and Cake or Something Like that
15 min Lamp redo- Sheer Fabric and Paint
I got this old lamp from some missionary friends that were moving. It wasn't my style but it was cheap. It had a bronze finish with little gems dangling from the lamp.
Sorry, I didn't take a before picture.
 I painted the base YELLOW! and I covered the shade with a yard of sheer gray fabric. I just wrapped it around the lamp and pinned it on one end. I change things up a lot in my home so I didn't want to sew anything on to the shade.
Thanks to a sweet friend who picked this LOVELY duvet up for me at Target and mailed it!!! We can't find that kind of chicness here without paying major $$$$. So this got me inspired and I finally decorated our room. I also got around to hanging the faux capiz chandelier I made a couple of months ago. The tutorial for the faux capiz chandelier is here

Sorry, I didn't take a before picture.

Thanks to a sweet friend who picked this LOVELY duvet up for me at Target and mailed it!!! We can't find that kind of chicness here without paying major $$$$. So this got me inspired and I finally decorated our room. I also got around to hanging the faux capiz chandelier I made a couple of months ago. The tutorial for the faux capiz chandelier is here
What to do with BREAD ENDS?
Waste not....... I keep my bread ends in a ziploc bag and once the bag gets full I make a breakfast casserole. Here are two recipes I love and use often.

Baked French Toast Casserole
from Cooks.com
2 loaves sour dough bread (crusts removed)
1 pkg. of cream cheese
1 tbsp. sugar
1 tart apples
6 eggs
1 c. milk
1 1/2 tsp. cinnamon
or Bacon and Berries Breakfast casserole recipe here

Baked French Toast Casserole
from Cooks.com
2 loaves sour dough bread (crusts removed)
1 pkg. of cream cheese
1 tbsp. sugar
1 tart apples
6 eggs
1 c. milk
1 1/2 tsp. cinnamon
Cut bread in half, layer half in casserole dish. Pat on cream cheese. Sprinkle on sugar and slices of tart apple. Add rest of bread and repeat. Pour mixture of eggs, milk and cinnamon over all. Bake at 375 degrees for 35 minutes.
or Bacon and Berries Breakfast casserole recipe here

Wall Decals/Adhesives using CONTACT paper
I have had this idea for over a year. I bought the contact paper and have used it for everything but Wall Stickers. Today I was redoing my room and was going to paint some canvases to put on the wall above the bed. We have a platform bed I really needed something to take up a lot of space. I got an AHA! moment so glad for those!
I usually name all of my art work even though this was only 10% painted I still named it STAND BY ME. It's two love birds out on a branch of a tree that is bare. Sometimes in our marriage we don't have much to give but all we need from our spouse is for them to just stand next to us. I love Shakespeare's Sonnet 116
Love is not love,
Which alters when it alteration finds,
Or bends with the remover to remove
O no! it is an ever-fixed mark
This size of Wall Sticker would of cost me $50 it cost me $3. I freehanded my tree and in some areas where I made the branch to thick I would just peel it off and slim it down. It is actually one long piece for the thick branch and then I added all the other ones on as I went along. If your not comfortable with freehand then print out your image, cut it out and trace it to the back of the contact paper. Use scissors or an exacto knife. I prefer scissors.
You could also use colored contact paper for the birds but I wanted to paint them.

 The DIY Faux Capiz Chandelier tutorial you can find here


I usually name all of my art work even though this was only 10% painted I still named it STAND BY ME. It's two love birds out on a branch of a tree that is bare. Sometimes in our marriage we don't have much to give but all we need from our spouse is for them to just stand next to us. I love Shakespeare's Sonnet 116
Love is not love,
Which alters when it alteration finds,
Or bends with the remover to remove
O no! it is an ever-fixed mark
- It worked fabulously!
- It only cost me $3 for the roll.
- It was so easy!
- It peels off the wall w/ no problem.

This size of Wall Sticker would of cost me $50 it cost me $3. I freehanded my tree and in some areas where I made the branch to thick I would just peel it off and slim it down. It is actually one long piece for the thick branch and then I added all the other ones on as I went along. If your not comfortable with freehand then print out your image, cut it out and trace it to the back of the contact paper. Use scissors or an exacto knife. I prefer scissors.
You could also use colored contact paper for the birds but I wanted to paint them.
Other ideas quotes, plain trees, butterflies....:
Monday, September 26, 2011
Sunday, September 25, 2011
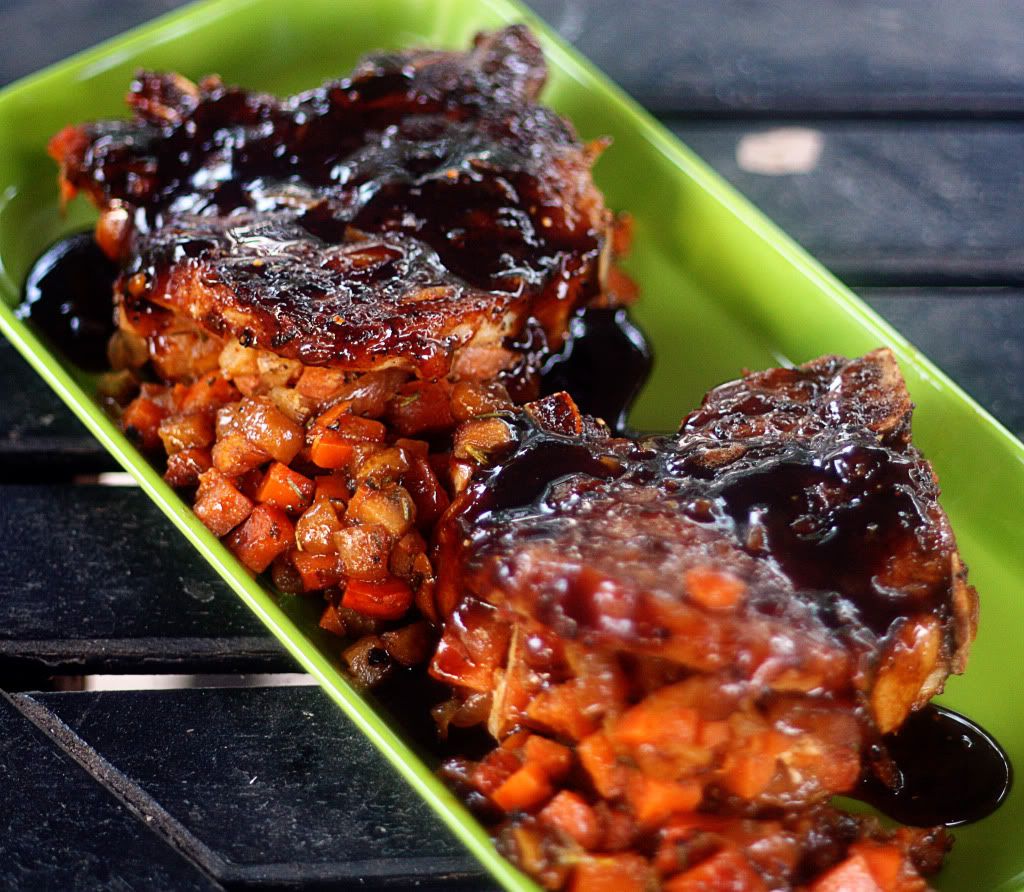
Sweet Potato & Apple Stuffed Pork Chops w/ Balsamic Orange Glaze
The aroma this dish gives off makes you salivate!
 Ingredients
3 pounds thick bone-in pork chops (6--8 ounce chops)
1 tablespoon season salt (used: Jane’s Crazy Mixed Up Salt)
2 tablespoons olive oil
2 sweet potatoes, peeled & medium dice
2 Granny Smith apples, peeled & medium dice
1 tablespoon butter
1 large onion, peeled, halved & sliced thin
1 tablespoon sugar
½ cup orange juice
1 tablespoon fresh thyme leaves, minced
Glaze
½ cup balsamic vinegar
1 cup orange juice
½ cup orange marmalade
1 tablespoon fresh ginger, minced
S&P, to taste
Remove onion to a bowl and set aside. Add sweet potato to pan and saute for 2 minutes.
Add apples, thyme, and fresh cracked salt and pepper. Saute for about 1 minute.
Add orange juice to deglaze the pan. Saute for about 2 to 3 minutes over medium-high heat to reduce liquid. Stir in sauteed onions. Pour off into a bowl and allow to cool to the point where you can handle it with your fingers.
Generously stuff the chops, pressing mixture firmly into the center pocket.
Meanwhile, combine all of the glaze ingredients into a sauce pot and place over medium heat and reduce until slightly thickened, just enough to lightly coat the back of a spoon.

Ingredients3 pounds thick bone-in pork chops (6--8 ounce chops)
1 tablespoon season salt (used: Jane’s Crazy Mixed Up Salt)
2 tablespoons olive oil
2 sweet potatoes, peeled & medium dice
2 Granny Smith apples, peeled & medium dice
1 tablespoon butter
1 large onion, peeled, halved & sliced thin
1 tablespoon sugar
½ cup orange juice
1 tablespoon fresh thyme leaves, minced
Glaze
½ cup balsamic vinegar
1 cup orange juice
½ cup orange marmalade
1 tablespoon fresh ginger, minced
S&P, to taste
Directions:
Start with thick bone-in pork chops. Rinse with cool water and pat dry with a clean paper towel.
Using a sharp boning knife, make a deep cut into the center of each chop, creating a pocket.
Season well, inside and out
Place in a preheated saute pan with 2 tablespoons olive oil and brown on both sides. Repeat with all chops. Set aside on a baking sheet.
Using the same saute pan, over medium-high heat, add 1 tablespoon butter and onions and saute. (If there is a lot of blackened bits left from the meat, scrape out and discard, but keep golden browned bits.)
Add 1 tablespoon sugar to the onions and continue sauteing until they reach a caramel/golden brown color.Remove onion to a bowl and set aside. Add sweet potato to pan and saute for 2 minutes.
Add apples, thyme, and fresh cracked salt and pepper. Saute for about 1 minute.
Add orange juice to deglaze the pan. Saute for about 2 to 3 minutes over medium-high heat to reduce liquid. Stir in sauteed onions. Pour off into a bowl and allow to cool to the point where you can handle it with your fingers.
Generously stuff the chops, pressing mixture firmly into the center pocket.
Meanwhile, combine all of the glaze ingredients into a sauce pot and place over medium heat and reduce until slightly thickened, just enough to lightly coat the back of a spoon.
Brush chops with glaze and place in preheated oven. Bake for a total of about 15 to 20 minutes, basting with glaze periodically.
Allow chops to cool on the pan, tented with foil for 10 minutes before serving. Drizzle with remaining glaze, if desired.

This wonderful recipe and first picture came from Jane Deere
Amazing Macaroni and Cheese
This was my first time making Bechamel pronounced (bejamel) it's french and basically a white sauce. I found this recipe over at Busy as a Bee in Paris (I adapted it) and had to try it since I am on a mission to find an easy & yummy macaroni cheese recipe. I think I found it! I blogged about another recipe I tried Stove-Top Macaroni and that one was good but I think this one tops it.

Macaroni with Bechamel Cheese Sauce
Ingredients:
1 bag of Macaroni Pasta cooked
5 tablespoons butter
4 tablespoons all-purpose flour
4 cups milk
2 teaspoons salt
1/2 teaspoon freshly grated nutmeg
3/4 cp of shredded mozzarella or whatever other favorite cheese you may have
1/2 cp of shredded cheddar or whatever other fav cheese you may have
pepper to taste
1. In a large pot, heat the butter over medium-low heat until melted. Add the flour and stir until smooth. Over medium heat, cook until the mixture turns a light, golden sandy color, about 6 to 7 minutes.
This is the Roux.
2. Meanwhile, heat the milk in a separate pan until just about to boil. Add the hot milk to the butter mixture 1 cup at a time, whisking continuously until very smooth. Bring to a boil. Cook 10 minutes, stirring constantly, then add mozzarella and cheddar and stir until it's completely smooth. Add the pasta and let it sit on the stove-top for 10 min on very low heat just until it's not soupy anymore.
3. Remove from heat. Season with salt and nutmeg.
OR for baking
4. Put cooked Pasta in a casserole dish and pour Bechamel Sauce over it and sprinkle the rest of the cheese all on top. Season with salt and nutmeg.
5. Bake at 375 until cheese has melted and it's a little crunchy about 10min.
Picture from My Recipes
Saturday, September 24, 2011
Caramel Stuffed Apple Cider Cookies
I brought these to a Potluck dinner and everyone oooohed and aaaahed. I think they look more amazing in the picture than they taste. Eye Candy!

Caramel Stuffed Apple Cider Cookie
recipe slightly adapted from The Cooking Photographer
Ingredients
1 cup softened butter
1 cup granulated sugar
1/2 teaspoon salt
1 box (7.4 oz) Alpine Spiced Apple Cider Instant Original Drink mix -not sugar free- all 10 packets (I found this in my grocery store near the hot chocolate mixes.)
2 eggs
1 teaspoon vanilla extract
1 teaspoon baking soda
1/2 teaspoon baking powder
1 teaspoon ground cinnamon
3 cups all purpose flour
1 bag Kraft Caramels (14 oz)
Directions
Preheat oven to 350° F. Line cookie sheets with parchment. (You really need the parchment!)
In a small bowl whisk together flour, baking soda, baking powder and cinnamon.
With your mixer (or an energetic spoon) cream together butter, sugar, salt and all 10 packages of apple cider drink mix powder, until light and fluffy.
Beat in eggs, one at a time. Add vanilla and mix well.
Gradually add flour mixture to butter/egg mixture. Mix until just combined.
Refrigerate for about an hour. (If you're really impatient you don't have to do this, but it makes it so much easier to work with.)
When you are ready to bake, unwrap your caramels.
Scoop out cookie dough ball about the size of a walnut. (I used a rounded cookie scoop-full. My scoop holds about a Tablespoon.)
Flatten the ball of dough slightly in the palm of your hand. Press the unwrapped caramel into the center of your dough and seal the dough around it, covering it completely. Place on parchment covered cookie sheets 2 inches apart.
Bake 12-14 minutes, or until very lightly browned around the edges. Please don't over-bake! Once the cookies are done, slide the parchment off of the baking sheet right out onto the counter. Allow cookies to partially cool on the parchment. When cookies are cool enough to be firm but still slightly warm, carefully twist off of parchment and allow to finish cooling upside down (either on the parchment or on a rack.) If you forget about them and they cool too much and stick to your parchment, put them into the freezer for a few minutes and they'll pop right off.
Yield: about 4 dozen, depending on how large you make your cookies (or how many caramels have been snitched out of your bag before you begin.) Store in an airtight container.
Sharing the Love
I am so glad these blogs featured these fall recipes because they are too good to keep to oneself! Thanks ladies for the feature!


Thursday, September 22, 2011
FUN Kid Friendly Halloween Party Ideas
A Halloween/Harvest Party has been a tradition in our family. Here in this country they do Day of the Dead which is mostly a religious holiday celebrated by Catholics. It is very different from the fun, light hearted celebrations we have so we have stuck to our simple, "let's celebrate fall and eat lots of goodies" type of party.
In the past I have tried to be innovative in my decorating to come up with some kid friendly fun ideas because our boys are young and blood and guts scare them. These are some of the kid friendly Halloween party ideas I have come up with and others are from BHG. Last year, I went with the purple, orange and black theme and the year before it was a Pumpkin Patch theme lots of pumpkin and hay.


In the past I have tried to be innovative in my decorating to come up with some kid friendly fun ideas because our boys are young and blood and guts scare them. These are some of the kid friendly Halloween party ideas I have come up with and others are from BHG. Last year, I went with the purple, orange and black theme and the year before it was a Pumpkin Patch theme lots of pumpkin and hay.
KID CRAFT:


Use a melon baller and cut an insert in the middle big enough for a tea candle. Glue wiggly eyes to the pumpkin and ahead of time make 4 small holes on the bottom to insert pipe cleaners for the legs.
FOOD:


Apple wedges sandwiched with caramel and marshmallows for teeth

Store bought Orange Punch and with a sharpie made pumpkin faces


Worm Juice- Gummy worms on the edges of the punch bowl. I taped to the outside of the bowl eyes.
Lolipops covered in orange tissue paper and pumpkin faces drawn on.

Hotdogs wrapped in frozen biscuit dough or dinner roll, crescent rolls also works and then bake.

healthy snack- mandarines pumpkins

Pumpkin cupcakes using choco. chips for the face and green fondant for the stem.

Bundt cake pumpkin cake
ACTIVITIES

Hang a picture frame from the ceiling and add lots of props for fun pictures


Decorate your pumpkin station. We had markers, feathers, tissue paper, pipe cleaners and paint out on the table for kids to do whatever they wished with their pumpkins

Lovely!
PARTY FAVORS
Orange Rice Krispie balls
If you go to http://search.bhg.com/search/s?q=halloween+party+ideas it has a list of different themed Halloween parties and free printables. The large professional looking pictures posted above are also from BHG.
Tuesday, September 20, 2011
Family Devotional: Making it come alive and practical
A friend gave us The Jesus Storybook Bible- Every story whispers his name.
We love it especially for our Family Devo time.
You can go on their website and download or just view the current Bible story video that goes along with the book for free http://www.jesusstorybookbible.com/index.php they change out the videos regularly. Sometimes depending on how much time we have we only read the Bible and watch the video or we use one of the following books below to help them have more of a visual to go with the Bible reading.
![The Jesus Storybook Bible: Every Story Whispers His Name [Book]](http://books.google.com/books?id=Tl1uQA36vRsC&printsec=frontcover&img=1&zoom=1&l=220 "The Jesus Storybook Bible: Every Story Whispers His Name [Book]")
I grew up in a family that carved time out of our day to read the Bible and to discuss it as a family. I must admit I went through a phase probably middle school when I had such a bad attitude at the dinner table when my dad tried to read to us. My father was not a bible scholar nor a learned man in the Bible but he felt very strongly about reading scripture as a family. Now as I look back to those days I feel so blessed to have had my father instill in me such a love for Jesus and a desire to pass on the truths of scripture to my children.
We also use this book along with our bible reading to give the kids more of a visual or hands on experience to what they are learning. You can get either of these books online or at your local Christian bookstore. Most of all of their ideas are very short and practical.
Or this one for older kids but we have also used it with our toddlers. This has some fun science tricks and each trick illustrates an important Bible Truth.
 This devotional we just use alone with the Bible. Our boys love because it talks about animals and also gives interesting facts about them such as:otters, iguanas, ants etc... and gives a little devotional using the animal. If you go Amazon.com you can get a peak inside the book.
We love it especially for our Family Devo time.
You can go on their website and download or just view the current Bible story video that goes along with the book for free http://www.jesusstorybookbible.com/index.php they change out the videos regularly. Sometimes depending on how much time we have we only read the Bible and watch the video or we use one of the following books below to help them have more of a visual to go with the Bible reading.
I grew up in a family that carved time out of our day to read the Bible and to discuss it as a family. I must admit I went through a phase probably middle school when I had such a bad attitude at the dinner table when my dad tried to read to us. My father was not a bible scholar nor a learned man in the Bible but he felt very strongly about reading scripture as a family. Now as I look back to those days I feel so blessed to have had my father instill in me such a love for Jesus and a desire to pass on the truths of scripture to my children.
We also use this book along with our bible reading to give the kids more of a visual or hands on experience to what they are learning. You can get either of these books online or at your local Christian bookstore. Most of all of their ideas are very short and practical.
Or this one for older kids but we have also used it with our toddlers. This has some fun science tricks and each trick illustrates an important Bible Truth.
Chicken Florentine Artichoke Bake
 SO GOOD! One of my favorite recipes.
ingredients
8 oz. dried bow tie pasta
1 small onion, chopped
2 garlic cloves minced
1 Tbsp. butter
2 eggs
1 c of heavy cream
3/4c of milk
1 tsp. dried Italian seasoning
1/4 to 1/2 tsp. crushed red pepper (optional)
2cups chopped cooked chicken
2 cups shredded Monterey Jack cheese (8 oz.)
1 14-oz. can artichoke hearts, drained and quartered
1 10-oz. pkg. frozen chopped spinach, thawed and well drained
1/2 cup oil-packed dried tomatoes, chop
1/4 cup grated Parmesan cheese
1/2 cup whole wheat crackers crushed
1/2 tsp. paprika
1 Tbsp. butter, melted

directions
1. Preheat oven to 350 degrees F. Cook pasta according to package directions; drain. In medium skillet cook onion and garlic in 1 tablespoon butter over medium heat about 5 minutes or until tender, stirring occasionally. Remove from heat; set aside.
2. In bowl whisk together eggs, milk, cream, seasoning, 1/2 tsp. salt, 1/4 tsp. black pepper, and crushed red pepper. Stir in chicken, Monterey Jack cheese, artichokes, spinach, tomatoes, half of the Parmesan, cooked pasta, and onion/garlic. Transfer to a 13x9x2-inch baking dish or 3-quart rectangular casserole.
3. Bake, covered, 20 minutes. In small bowl combine remaining Parmesan, crushed crackers, paprika, and melted butter. Sprinkle mixture over pasta. Bake, uncovered, 10 minutes more or until golden. Makes 6 to 8 servings.
I adapted this recipe from BHG and picture is from also from there.
Subscribe to:
Posts (Atom)