I love to have fun with paper, food, paint, music and events and just being creative in all of it. However, I don't feel the need to be a perfectionist nor a professional in any of my creations. I wish I could have a blog JUST about the art of cooking, photography, sewing, art, mothering, jewelry making, card making, dancing, gardening, deep spiritual thoughts, decorating, poetry, party planning, baking.... and the list goes on but I can't. I don't think I was created with the ability to focus on one task. I like all of these hobbies layed out before me and the freedom to pick whatever I choose depending on the mood or time I have.

Saturday, May 28, 2011

decoupaged decor balls


These styrofoam balls have been sitting around my house for sometime now waiting to be put to use other than being thrown around as toys for my boys amusement.

You will need: 
Styrofoam balls
napkins are what I used to cover them with
modge podge glue
brush
scissors
varnish

1. Cut napkins into strips. I did my into fourths and then into fourths again.

2. Add Modge Podge over the styrofoam ball and then a strip of the napkin. Do this until its completely covered.

It may get sticky so letting it dry some would be a good idea before adding more pieces to it.  I didn't because I wanted to be done.

3. Add a couple of coats of clear varnish.


There you have it!

There are so many things you can do with styrofoam balls. I found these on the web, I have no idea where they came from:

Saturday and Monday Link ups

http://funkyjunkinteriors.blogspot.com/

http://nv-craftenvy.blogspot.com/

http://www.iamonly1woman.blogspot.com//

Monday
http://www.creatingreallyawesomefreethings.com/
http://memakingdo.blogspot.com/
http://www.thegirlcreative.com/search/label/Just%20Something%20I%20Whipped%20Up
http://sewcando.blogspot.com/

DIY Faux Metal Raised Mirror made from Reynolds Wrap

A mirror really helps a room come together or make a room look bigger. 


This mirror has the appearance of a hammered metal mirror that I have priced starting at  over $50 mine cost $3.
Bright EYED bushy tailed at MIDNIGHT.
So what does one do?  CREATE!
I bought this mirror for $3 it was HIDEOUS but my hope was to redo it. 
I wasn't sure how it would be redone until last night when my creative juices were flowing at Midnight.

It was very simple and you probably have all the supplies lying around your home.
Need: aluminum foil
cardboard/cardstock paper
craft glue or glue gun
black paint
brush
scissors

1. I used the cups you see above as my template for 3 different sized circles.
2. I traced the circles onto cardstock paper.
3. I cut up my foil to fit around the cirlces and balled it up to give it that wrinkled look.

4. Cover the circle in the foil.

5. Paint the circle with the black paint.
6. If you have too much paint on the circle before it totally dries wipe it down so it has that old silver look.
7. Glue them on.  Since I used 3 different sizes I tried to evenly place them throughout the mirror.

I was very impressed with how it looks so authentically metal.  Our company always asks where I bought this metaled mirror from and I LOVE to smile and tell them it's Reynolds Wrap.

Friday, May 27, 2011

Mango Avocado Salsa

Mango Avocado Salsa


Ingredients
1 large ripe or soft mango peeled and cut into small pieces
1 Avocado, peeled and cut into small pieces
1 cp of diced tomato
1/4 cup red onion, diced
1 jalapeno pepper, seeded and diced
2 lime, juice
2 tspn of salt
1 handful cilantro, chopped
1. Mix altogether.

Jerk Fish on Coconut Rice and Mango Avocado Salsa

I saw this recipe over at Closet Cooking and I had to try it.  My mouth was watering as I took in the wonderful citrusy and spicy aroma causing my stomach grumble.  My tummy couldn't wait to be appeased with some of this deliciousness. 

I am also glad that my 7 and 4 year old loved it!  I did leave out the spicy ingredients for their sake though I prefer it to be spicy.
Closet Cooking used pineapple banana salsa but I went with Mango Avocado Salsa.

Ingredients
1 pound white fish fillets   I used Tilapia
1 batch jerk marinade recipe below
1 cup jasmine rice
1 cup coconut milk, unsweetened
1 cup water
1 batch mango avocado salsa here

Directions
1.Marinate the fish fillets for at least two hours in a ziplock bag in the fridge.  I didn't have 2 hours so I just marinated it for 30min.
2.Bring the rice, coconut milk and water to a boil, reduce the temperature to medium low, cover and let simmer until the rice is tender and the liquid has been absorbed, about 20 minutes. Add salt to taste.
3.Meanwhile, place the fish in a baking dish and bake in a preheated 350F oven until cooked, about 15-20 minutes.
4.Serve the jerk fish on the coconut rice and top with the mango avocado salsa.

Jerk Marinade  also from Closet Cooking
Ingredients:
1 scotch bonnet or habanero pepper or 3 jalapeno peppers (seeded and chopped)
2 cloves garlic (chopped)
2 green onions (chopped)
1 tablespoon thyme (chopped)
1 tablespoon allspice
3/4 teaspoon nutmeg
3/4 teaspoon cinnamon
1 teaspoon pepper
1 tablespoon brown sugar
1 tablespoon olive oil
2 tablespoons white vinegar
2 tablespoons soy sauce
1 tablespoon dark rum
1/2 orange (juice and zest)
1 lime (juice and zest)
Directions:

1. Puree everything.
I didn't have the rum so I left this out and I used apple cider vinegar instead of white vinegar. I left out the peppers. I know I was sad to leave this out but when your cooking with kids you tweak things.  I did sprinkle crushed red pepper on my plate but its not the same.

Wednesday, May 25, 2011

Gathered borders or ruffled? That is the question

cirrus bedding

I am in the process of trying to buy fabric to make one of these and can't figure out which one is more work.
The gathered borders duvet from Anthropologie. With this one I don't need to find fabric that doesn't fray easily.

Or the botton picture from Urban Outfitters that is ruffled.
I know for a fact that ruffles are time consuming and after making my curtains I now know to find fabric that doesn't fray for ruffles.
Decisions, decisions......

Picnic deliciousness: Caramalized Onions, Bacon, Brie, Ham Sandwich on Foccacia bread with Chipotle Sauce

Picnic Yumminess!  We were having a little picnic with another couple and I wanted to make some yummy sandwiches as a thank you because they watched our boys (all 3 of them) while we were having our garage sale.

The post below is my recipe for foccacia bread.  I divided my dough into two batches because I knew ahead they were for sandwiches and didn't want the bottom bread seasoned. 

You need:
cooked bacon strips
deli ham
1/2 cp chopped onions
1 tbspn brown Panela or brown sugar
3 tbspns Mayo or Ranch Salad dressing
Chipotle hot sauce (optional) or can of chipotle
Brie cheese

1. Cook bacon strips. 
2. I used the same grease from the bacon to sautee my onions until they were tender. Then pour Panela over it and let them caramelize
3. Put Chipotle Sauce on both sides of bread, brie and then add warm caramelized onions to slightly melt the brie and top with ham and bacon strips.

Chipotle Sauce:
3. In a small bowl mix mayo or ranch dressing and chipotle sauce.  I put about 2tspns of chipotle sauce in it.  If your using canned chipotle you will need to use your judgement on how spicey you want it. 

In my opinion foccacia bread calls for dipping it in something so I usually make enough Chipotle Sauce for dipping.  You can also use Chicken instead of Ham either one taste good!
Packaged for Picnic Cuteness!

I am happy to report Foccacia Bread is so easy to make!

The thought of making foccacia bread seemed daunting I had not even looked at a recipe yet but I just got it in my head that it was an overwhelming task. 

I am happy to report it is really easy!  Yes, only a couple of ingredients to make the basic bread and then you can top it with whatever butters your biscuit.

I used this recipe from allrecipes.com  for the basic bread and then I jazzed it up with some of my favorite things.
Ingredients:


3 1/2 cups all-purpose flour
1 teaspoon white sugar
1 teaspoon salt
1 tablespoon active dry yeast
1 cup warm water
2 tablespoons vegetable oil
1 egg
3 tablespoons olive oil
1.In the bowl of an electric mixer, mix 1 cup flour, sugar, salt, and yeast.


2.Mix in warm water, vegetable oil, and egg until dough is moist.

3.Beat on medium for 2 additional minutes.

4.Stir in 1 3/4 cup flour while beating until dough pulls away from the side of the bowl.

5.Remove dough from the bowl and knead in 3/4 cup flour on floured surface.

6.Cover dough and let sit for 5 minutes.

7.Place dough on a greased baking sheet. Roll out to a 12 inch circle (or whatever shape you choose).

8.Cover with plastic wrap and a cloth towel.

9.Place in a warm place for 30 minutes.

10.Uncover dough, and poke holes in it with a spoon handle at 1 inch intervals.

11.Drizzle olive oil on dough.

12.Bake at 400 F for 17 to 27 minutes, until just golden.
Top it with whatever butters your biscuit!  I used parmesan, salt, italian seasoning.
I separated mine into two batches because I was making sandwiches in it and didn't want to season one of them. Caramelized Onions, bacon, brie and ham sandwiches with Chipotle Sauce recipe in post above.

Sunday, May 22, 2011

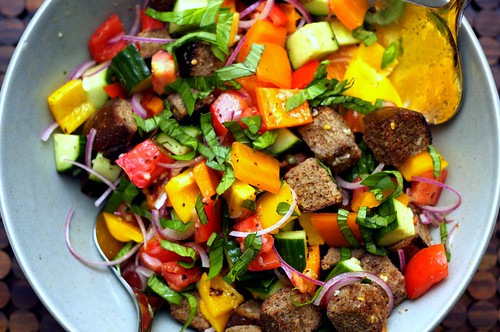
Fresh and Satisfying Salad: Panzanella

summer's last hurrah panzanella
You learn so much from perusing the internet!  I came across this recipe with the name PANZANELLA and I thought thats a fun word to say. Now try saying it with an italian accent and holding your hands out. Once I got over my childish word games I decided to google it and immediately I became intrigued by all the colors and description of this classic Italian Tuscan summer salad.  It's like bruschetta in a salad.

I am so glad I googled Panzanella because I so want to try it. It looks mouth watering!  Apparently, there are 5000 ways to make this (exaggerating a bit). Smitten Kitchen makes it like this recipe.  This is also there beautiful picture!  The Hungry Struck website makes it with brie recipe
Some people make it with couscous, less veggies, more veggies, some add pine nuts or capers others use pita bread, rye bread or french bread, some with brie or mozzarella...... the different ways are endless.

Tip from a chef I came across in my perusing:
-The real key to getting the best flavor out of the salad is to salt the tomatoes before you begin cooking the vegetables and bread.
-Make sure bread is stale and hard otherwise you end up with a wet mushy bread salad, ewwww.

Italian Summer Salad

Italian Summer Salad is what I named this yumminess! 

Ingredients:
1 cp of cooked sausage of your choice
1 pound of Pasta of your choice (shell, bowtie, etc...)
1/4 cp of cubed brie w/ the rind removed
1 qt Grape tomatoes cut in half or diced tomato
1 tbspn Italian seasonings
1/4 cp olive oil
1/4 cp Sundried tomatoes that have been chopped
1/4 cp parmesan
salt and pepper to taste

1. Cook pasta as package directs.
2. Dice sausage and cook. We used Creole Seasoned Sausage, absolutely delicious!
2. Drain cooked pasta and pour into a large bowl.
3. Add olive oil immediately so pasta doesn't stick together.
4. Add the cooked sausage and the rest of the ingredients.

Serve cold

Thursday, May 19, 2011

Frilly Fru-Fru Project #1: Ruffles, Rumples, & more Ruffles Curtains

When the wind blows through my living room window I want my curtains to daintily dance as each ruffled  & rumpled row gracefully moves with the breeze!

So the inspiration was born immediately when I saw the light airy gray curtains from Urban Outfitters. My desires for my Frilly Fru-Fru Curtains started Grand! I was going to cover the whole panel with ruffles and more ruffles.  Just like this:  Aren't these lovely cascading curtains inspiring. Well, the inspiration went out the window as soon as I started making these suckers.  WARNING: They are adorable but they are time consuming.  Also, use the RIGHT kind of no fray fabric.  It took me 2 days working on them for 4 hours each day. This may not seem like a lot of time for some but for me it was waaaay too long to spend on a project. It was worth it though. So I tweaked my idea to partial ruffles like this: Ruffled Curtains
The fabric I bought for this project was not NO-SEW friendly so that meant that I had to sew each ruffled row on both sides.  So my curtains went from this to 6 rows of ruffles and rumples on my curtains.  It still looks great and sometimes when your lazy and sewing is not fun for you tweaking your original idea is okay :).  The lady from A Drop In the Bucket blog here used bed sheets and cut them up which apparently this fabric didn't need to be sewed from both sides so all she had to do was sew it on her main panel and voila she was done.  A Drop in the Bucket blog which also has a tutorial says "it was pretty darn easy to re-create and so much cheaper".  In my experience this was not the case because of the fabric I used. On the bright side though they were so much cheaper to make.
 
Tutorial for all of you who didn't use no fray fabric for your ruffles or for some reason feel the need to sew both ends of your ruffles:
1. Lay your fabric out
2. I folded my fabric in 1/2 twice so that I was cutting lots at one time. It made my cutting easier.
3. I used a book the width I wanted and used that to measure each row.  This helped ensure that all my rows were the exact same size.  If rulers work for you than go with that.
4. Once all your rows are outlined on the fabric start cutting away.
5. I used a simple zig zag stitch on the side of the ruffled rows that would hang down and I folded in the side that I sewed onto the panel.
6. I sewed all of these zig zag rows first.
7. Then I folded in the other side of the rows and pinned them on to the fabric.  I started pinning each row leaving about 1inch hanging over the hem of the row before it. So each row overlaps about an inch.
8. I did this for 5 rows that was ALL I could handle.

This is NOT the finish product. I still need to add a row of rumples at the top.  It will go in our new house which we are not in yet so you won't get the whole effect til later.